If you’re getting ready to purchase a new HVAC system, the installation process is as important as the unit you decide to buy. A properly installed system will provide you with the comfort you expect and lower cost heating and cooling. By understanding the installation process, you can determine if everything is going according to plan.
Decide on a Contractor
The first steps of both the heating installation and cooling installation process involve finding the right contractor for the job. Once you’ve made a comprehensive list of the licensed and insured contractors in your vicinity, you should ask for estimates. Experts recommend getting estimates from at least four contractors, if possible.
When you receive an estimate, it should include project start and completion dates, the pricing for the job, cleanup costs, and details of what the project will involve. You should also ask questions to understand what type of warranty you will receive after the installation.
To provide the estimate, an HVAC technician will conduct an initial assessment of your property. They will assess your heating and cooling needs, evaluate the existing system if there is one, and determine the optimal location for the new equipment. This step helps ensure the HVAC system is appropriately sized and positioned to maximize efficiency and performance. Based on the assessment, the HVAC professional will recommend suitable equipment options tailored to your specific requirements.
Once you choose a contractor, you will select the equipment you want installed. The HVAC company will order your new system and ensure you receive high-quality products from trusted manufacturers.
Final Preparations
There are a few steps you should take before the contractor arrives at your home. These steps will expedite the process and allow the installation to be completed on time. You should ensure the work area is easy to access.
You may also want to move things like computers or other valuables to a secure location. In general, contractors will move furniture if necessary, but if you have furnishings that have sentimental value, you may want to take care of this yourself to ensure they do not get damaged.
If the installation involves an outdoor unit, you should mow the area and make it accessible. As a courtesy, you may also want to make sure the technicians have a place to park. They will have to make multiple trips to and from their vehicle during installation. Finally, you should have a plan for your pets, like moving them to a quieter area of the home or arranging for a friend to take them while the work is in progress.
Length of the Installation Job
In most scenarios, replacing one HVAC system with another is a one-day job. However, it may extend into a second day or longer if the technicians encounter unexpected issues like having to remove asbestos. The installation may also take longer if the equipment is being installed in tight spaces like attics.
If your house does not have any ductwork or HVAC units yet, it will take longer than a replacement. The timeframe depends on how complex the job is and what type of equipment is installed. However, this process usually takes three to five days.
Preparing the Area
When they first arrive, the HVAC installation team will place protective clothes and materials on the floor to ensure that workers do not damage your flooring during the installation process. They will then spend time moving furniture pieces and other possessions away from the work area. Since a large amount of dust is often produced throughout this process, they will cover some items in your home with lightweight plastic. Following preparation, workers will move their tools inside your home.
Installation Process
The installation process involves several steps. The lead installer overseeing the project will be responsible for making sure these steps are followed correctly.
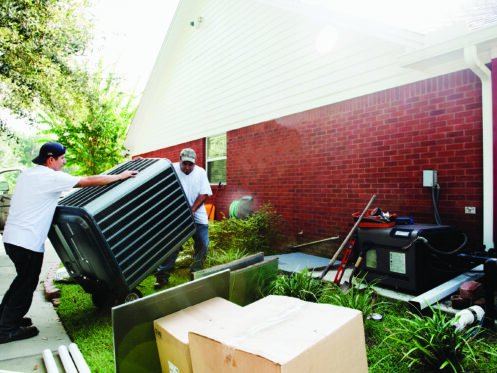
Removing the Current Unit
The amount of work that occurs during the removal process depends on the type of system you’ve bought. If you purchase a completely different type of unit than the one you have, all of the equipment may need replacing. This may involve gaining access to attic areas, crawl spaces, and basements that typically house the HVAC system.
After switching off the power for the existing unit, the crew will remove any toxic chemicals from the system, such as refrigerant, and dispose of them properly. They will then disassemble the old system, making removing it from your home easier.
New Unit Installation
Even though most HVAC replacements are completed in a day, your installation process can extend further if some of your ductwork needs repair. Over the years, there’s a chance that the ducts in your home have undergone extensive wear and tear. In this situation, the workers must repair or even replace ductwork. The cost and time involved in replacing and repairing ductwork should have been discussed as part of your estimate.
When duct repairs are necessary, the contractor’s team will implement fixes and modifications in your attic or crawlspace before they install your new unit. One or two crew members will usually begin to work on the ducts while the lead installer starts assembling the new equipment.
Depending on the type of system you purchase for your home, technicians will be working inside and outside. Many systems include one or more indoor units as well as an outdoor unit. For example, a central air conditioning system has an outdoor condenser that houses a heat exchange coil, compressor, and fan. Refrigerant supply lines run from the condenser to the indoor unit, which is the evaporator. Along with evaporator coils, the indoor unit also consists of a fan and fan motor.
Sometimes, the workers have to perform additional repairs during the project. These repairs include everything from electrical enhancements to wall stud replacements. Some indoor air handlers are mounted on wall studs. These are vertical wood frames supporting your home’s drywall.
During installation, your contractor may have to replace a wall stud or add reinforcement to support the unit’s weight. If new wires need to be sent from the air handler to your electrical panel, your contractor might need to remove portions of your drywall during installation. The workers will repair any damage to your walls after the wires are in place.
Testing
Once the technicians have completed the installation, they will test your new system to ensure every component works correctly. Once the testing is complete, your contractor will help you understand the system and its warranty. If you’ve had a new thermostat installed, they can provide a short tutorial on how to use it.
Contact the Professionals
At Sigwald Service Co., we have been serving the residents of Rockport, TX since 1980. We install, maintain and repair heating and cooling systems. In addition, we invite you to join one of our membership programs. Participants get annual HVAC tune-ups, pay no overtime fees, and may get discounts on repairs. Contact Sigwald Service Co. today to discuss installing a new HVAC system for your home.